Create a Mac Policy to Delay or Block Golden Gate
In September 2026, Apple released the latest version of their operating system, macOS 27 Golden Gate, to the general public. JumpCloud policies allow you to delay or block major software upgrades until your environment is ready to upgrade.
- If your organization is not yet ready for macOS 27 Golden Gate, use the options below on your MDM-enrolled Mac computers to delay it from being installed.
- Major macOS releases cannot be permanently blocked from appearing in System Settings > General > Software Update. You can only delay releases for a maximum of 90 days.
To delay the upgrade to macOS 27 Golden Gate:
- To prevent the update from appearing on individual Mac computers from within System Settings > Software Update, configure deferral in your Patch Management policies:
- If you’re still using legacy patch policies, configure this via Device Management > Patch Management > Defer Upgrade Releases. See Using Legacy Patch Management Policies.
- If you’ve migrated to DDM-based patch policies, configure this via Device Management > Patch Management using Defer Major OS Upgrades for _ Days. See Using DDM-Based Patch Policies.
- Restrict the macOS Golden Gate installer from running using the Block macOS Golden Gate Installer policy. Users are allowed to download the installer, but the installer will be blocked from launching. See Blocking the macOS Golden Gate Installer.
If your organization does not use JumpCloud Patch Management, the standalone Delay Major macOS Software Upgrades policy is no longer available. You can still use the Block macOS Golden Gate Installer policy, but it only prevents the Install macOS Golden Gate.app from launching. It does not prevent macOS 27 Golden Gate from appearing or installing through Software Update.
Prerequisites:
- Mac computers must be enrolled in MDM to deliver policies. See Get Started: Apple MDM.
Delaying Major macOS Upgrades
JumpCloud’s patch policies (Device Management > Patch Management) help organizations manage their operating system versions, including managing new major version releases. You can specify a delay of up to 90 days for new major versions of macOS. How you defer macOS 27 Golden Gate depends on whether you’re still using legacy patch policies or you’ve migrated to DDM-based patch policies.
Using Legacy Patch Management Policies
If you’re still using legacy patch policies, delay major upgrades with Defer Upgrade Releases in the Major Upgrade Settings section. See Create a macOS Patch Policy.
Legacy macOS update policies are scheduled for deprecation and aren’t supported on macOS 27 and later. JumpCloud recommends migrating Mac computers running macOS 15 or later to the DDM-based Automatic macOS Updates policy. See Create a DDM-Based macOS Patch Policy.
To add a delay, make sure Defer Upgrade Releases is selected, and then set a number of days from 1 to 90. The default is 30 days.
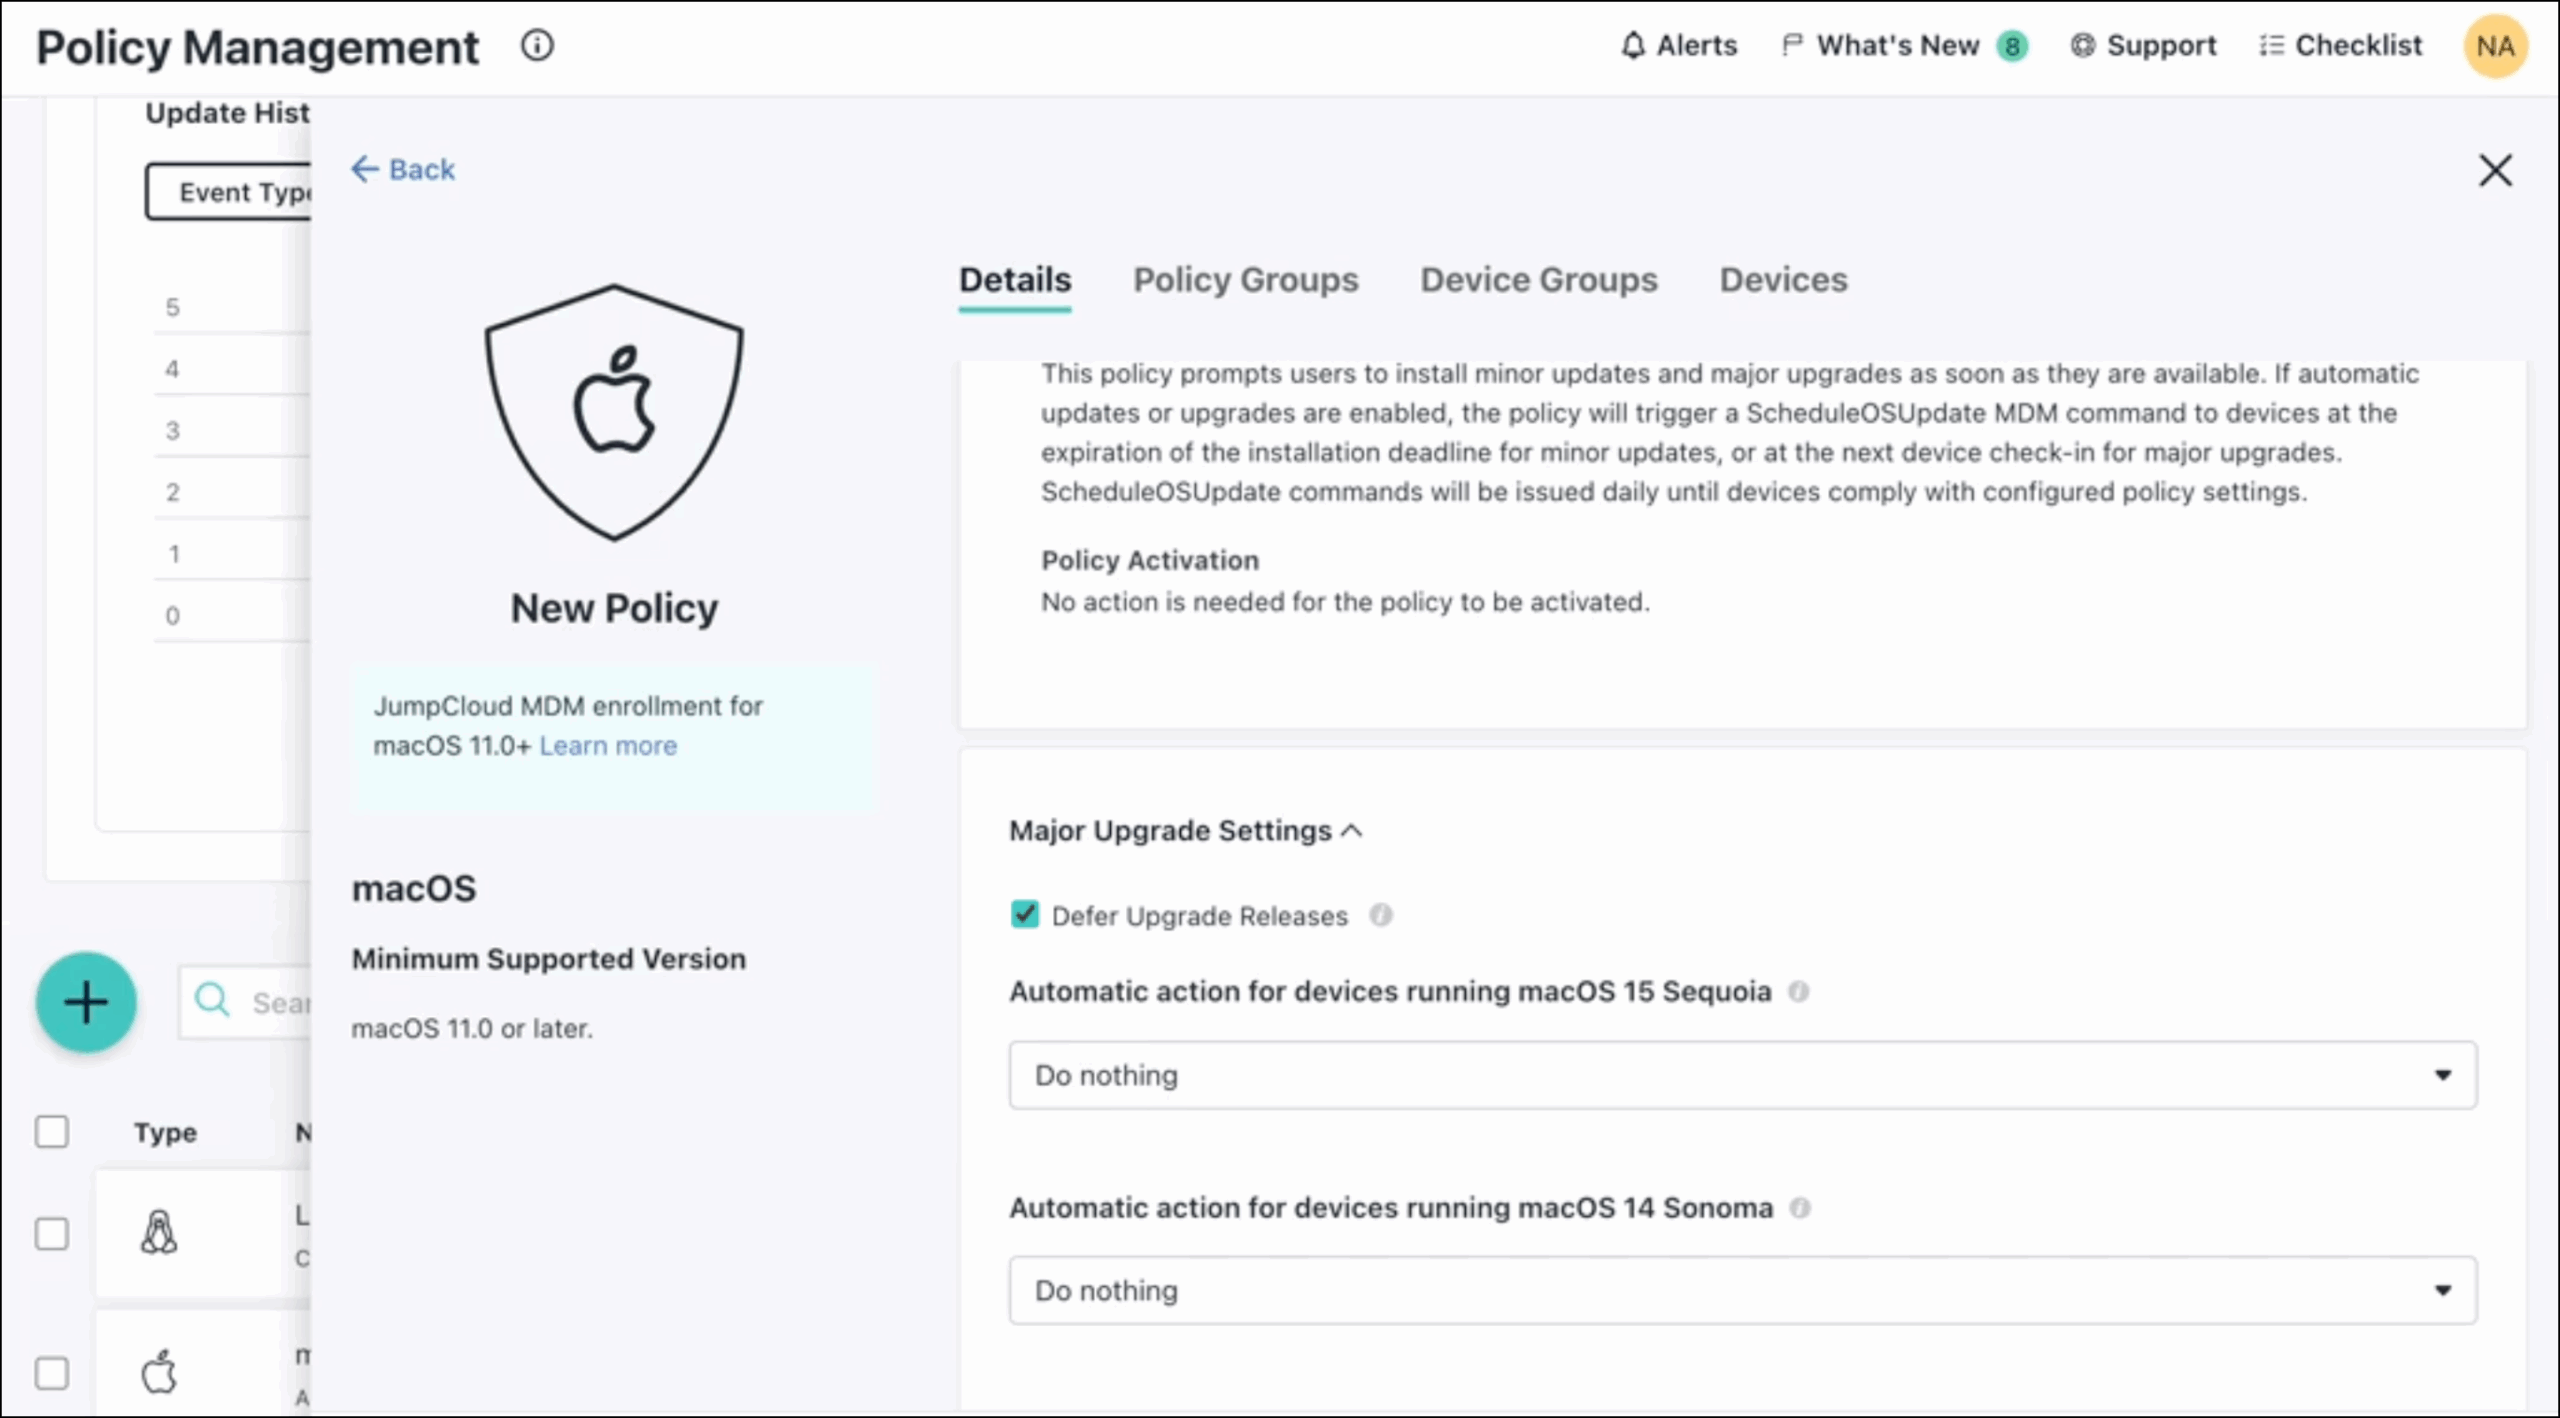
For each policy in your patch rings (Vanguard, Early Adoption, General Adoption, Late Adoption), update the Major Upgrade Settings if you need to delay macOS 27 Golden Gate.
After macOS 27 Golden Gate is approved for use within your organization, uncheck Defer Upgrade Releases and allow upgrades to proceed as normal.
Automatic Action Changes
JumpCloud has implemented updated automatic actions for Mac computers running older versions of macOS, which will allow you to target older versions of macOS to upgrade automatically to macOS 27 Golden Gate.
Using DDM-Based Patch Policies
If you’ve migrated to DDM-based patch policies, delay major upgrades with Defer Major OS Upgrades for _ Days under General Settings.
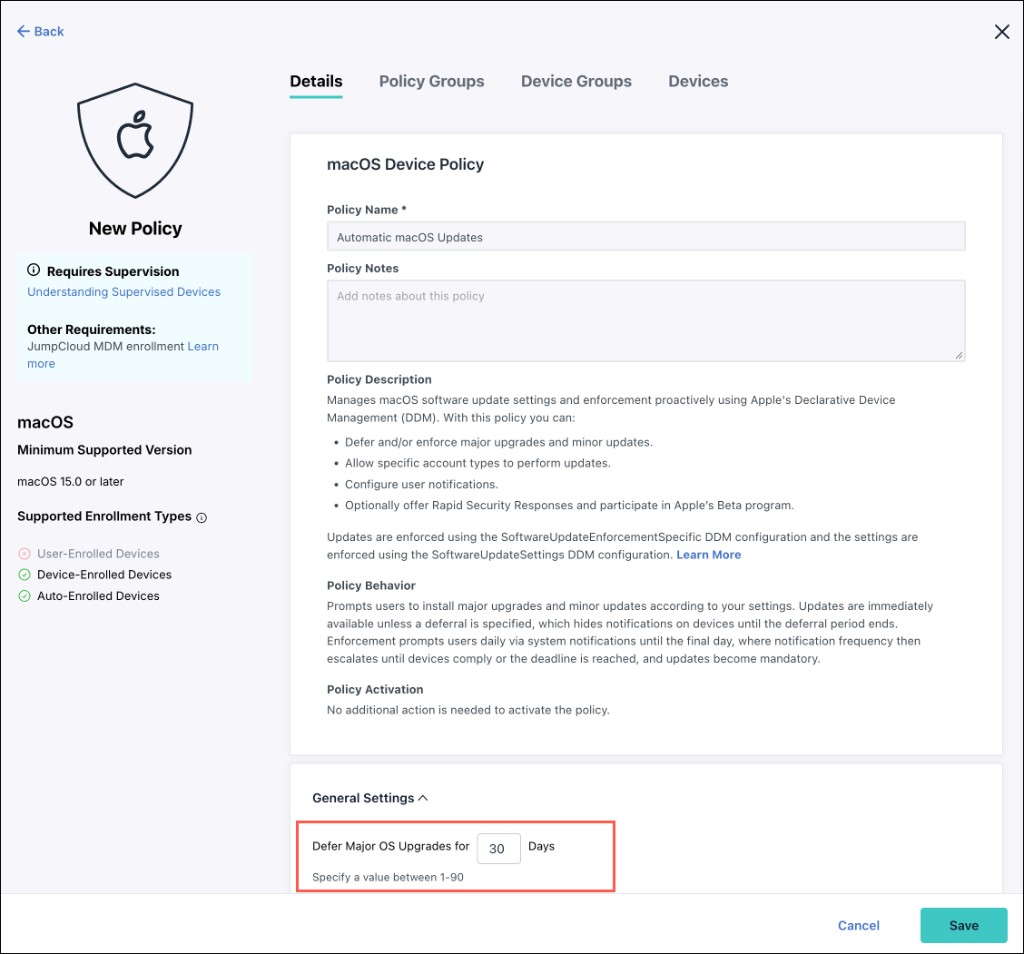
Open an existing DDM-based macOS patch policy from Device Management > Patch Management, or create a new one with (+) > macOS - NEW, then set Defer Major OS Upgrades for _ Days to a value from 1–90. For full configuration steps, see Create a DDM-Based macOS Patch Policy.
If you use deployment rings (Vanguard, Early Adoption, General Adoption, Late Adoption), update Defer Major OS Upgrades on each DDM-based macOS ring policy that should delay Golden Gate.
After macOS 27 Golden Gate is approved for use within your organization, reduce or clear the deferral so upgrades can proceed as normal.
Blocking the macOS Golden Gate Installer
This policy prevents the macOS Golden Gate installer from running on Mac computers. If users have downloaded the installer via the App Store or other methods, the installer will be blocked from launching. When a user attempts to launch the installer, it is automatically terminated. No notification or block message is displayed to the user.
- The Block macOS Golden Gate Installer policy can only prevent the Install macOS Golden Gate.app from running. It cannot block the update from appearing or running from Software Update.
- After this policy is saved and applied, users must log out and log back in for enforcement to begin. If the policy is removed, users must log out and log back in for the change to take effect.
To create a Block macOS Golden Gate Installer policy:
- Log in to your JumpCloud Admin Portal.
If your data is stored outside of the US, check which login URL you should be using depending on your region. If your organization uses LDAP, RADIUS, or requires firewall allow list configuration, the Fully Qualified Domain Names (FQDNs) will also be region specific. See JumpCloud Data Centers for the URLs, FQDNs, and IP addresses.
- Go to Device Management > Policies.
- Click (+).
- Select Device Policy to assign the policy to devices and device groups.
- On the New Device Policy panel, select the macOS tab.
- Select the Block macOS Golden Gate Installer policy from the list, then click configure.
- (Optional) Add details or context regarding this policy to the Policy Notes.
- (Optional) Select the Policy Groups tab and select one or more policy groups that will include this policy.
- Select the Device Groups tab and select one or more device groups where you’ll apply this policy. For device groups with multiple OS member types, the policy is applied only to the supported OS.
- Select the Devices tab and select one or more devices where you’ll apply this policy.
- Click Create Policy.
Was this information helpful?