Create a Device Level iOS and iPadOS App Settings Privacy Policy
The App Settings Privacy policy lets you recommend privacy permission defaults for one or more applications on managed iPhone and iPad devices. When a matching application launches, iOS or iPadOS can show a consent prompt that includes your organization justification and the defaults you configured. The User can allow those defaults or continue with the standard permission prompts.
This is a device-level policy that applies system-wide to the device and all of its users. You can bind this policy to individual devices or device groups. For policies that apply to a specific user's profile across devices, see Get Started: Policies and Learn More section of this article.
JumpCloud delivers this policy to eligible supervised devices.
Prerequisites
- Apple Mobile Device Management (MDM) must be configured for your organization, and iPhone and iPad devices must be enrolled in JumpCloud MDM. See Set up Apple MDM.
- Target devices must use supervised enrollment.
- Target devices must run iOS 27 or later or iPadOS 27 or later.
Considerations
- Policy settings apply automatically. No restart is required.
- If the User has already seen all configured permission requests for an application, iOS or iPadOS does not show the App Settings consent prompt again for those permissions.
- A device must be supervised and run a supported OS version before the policy can be reported as successfully applied.
Creating the Policy
Selecting the Policy Template
- Log in to the JumpCloud Admin Portal.
If your data is stored outside of the US, check which login URL you should be using depending on your region. If your organization uses LDAP, RADIUS, or requires firewall allow list configuration, the Fully Qualified Domain Names (FQDNs) will also be region specific. See JumpCloud Data Centers for the URLs, FQDNs, and IP addresses.
- Go to Device Management > Policy Management. The Policy Management page is displayed.
- On the Policy Management page, click (+) Add New.
- Select Device Policy.
- Select the iOS tab.
- Search for and select App Settings Privacy, then click Configure.
- On the Details tab, configure the settings described below.
- (Optional) In the Policy Name field, enter a unique name for the policy, or keep the default.
- (Optional) In the Policy Notes field, enter details such as the creation date and deployment notes.
The Details tab also includes tabs for policy groups and device assignment.
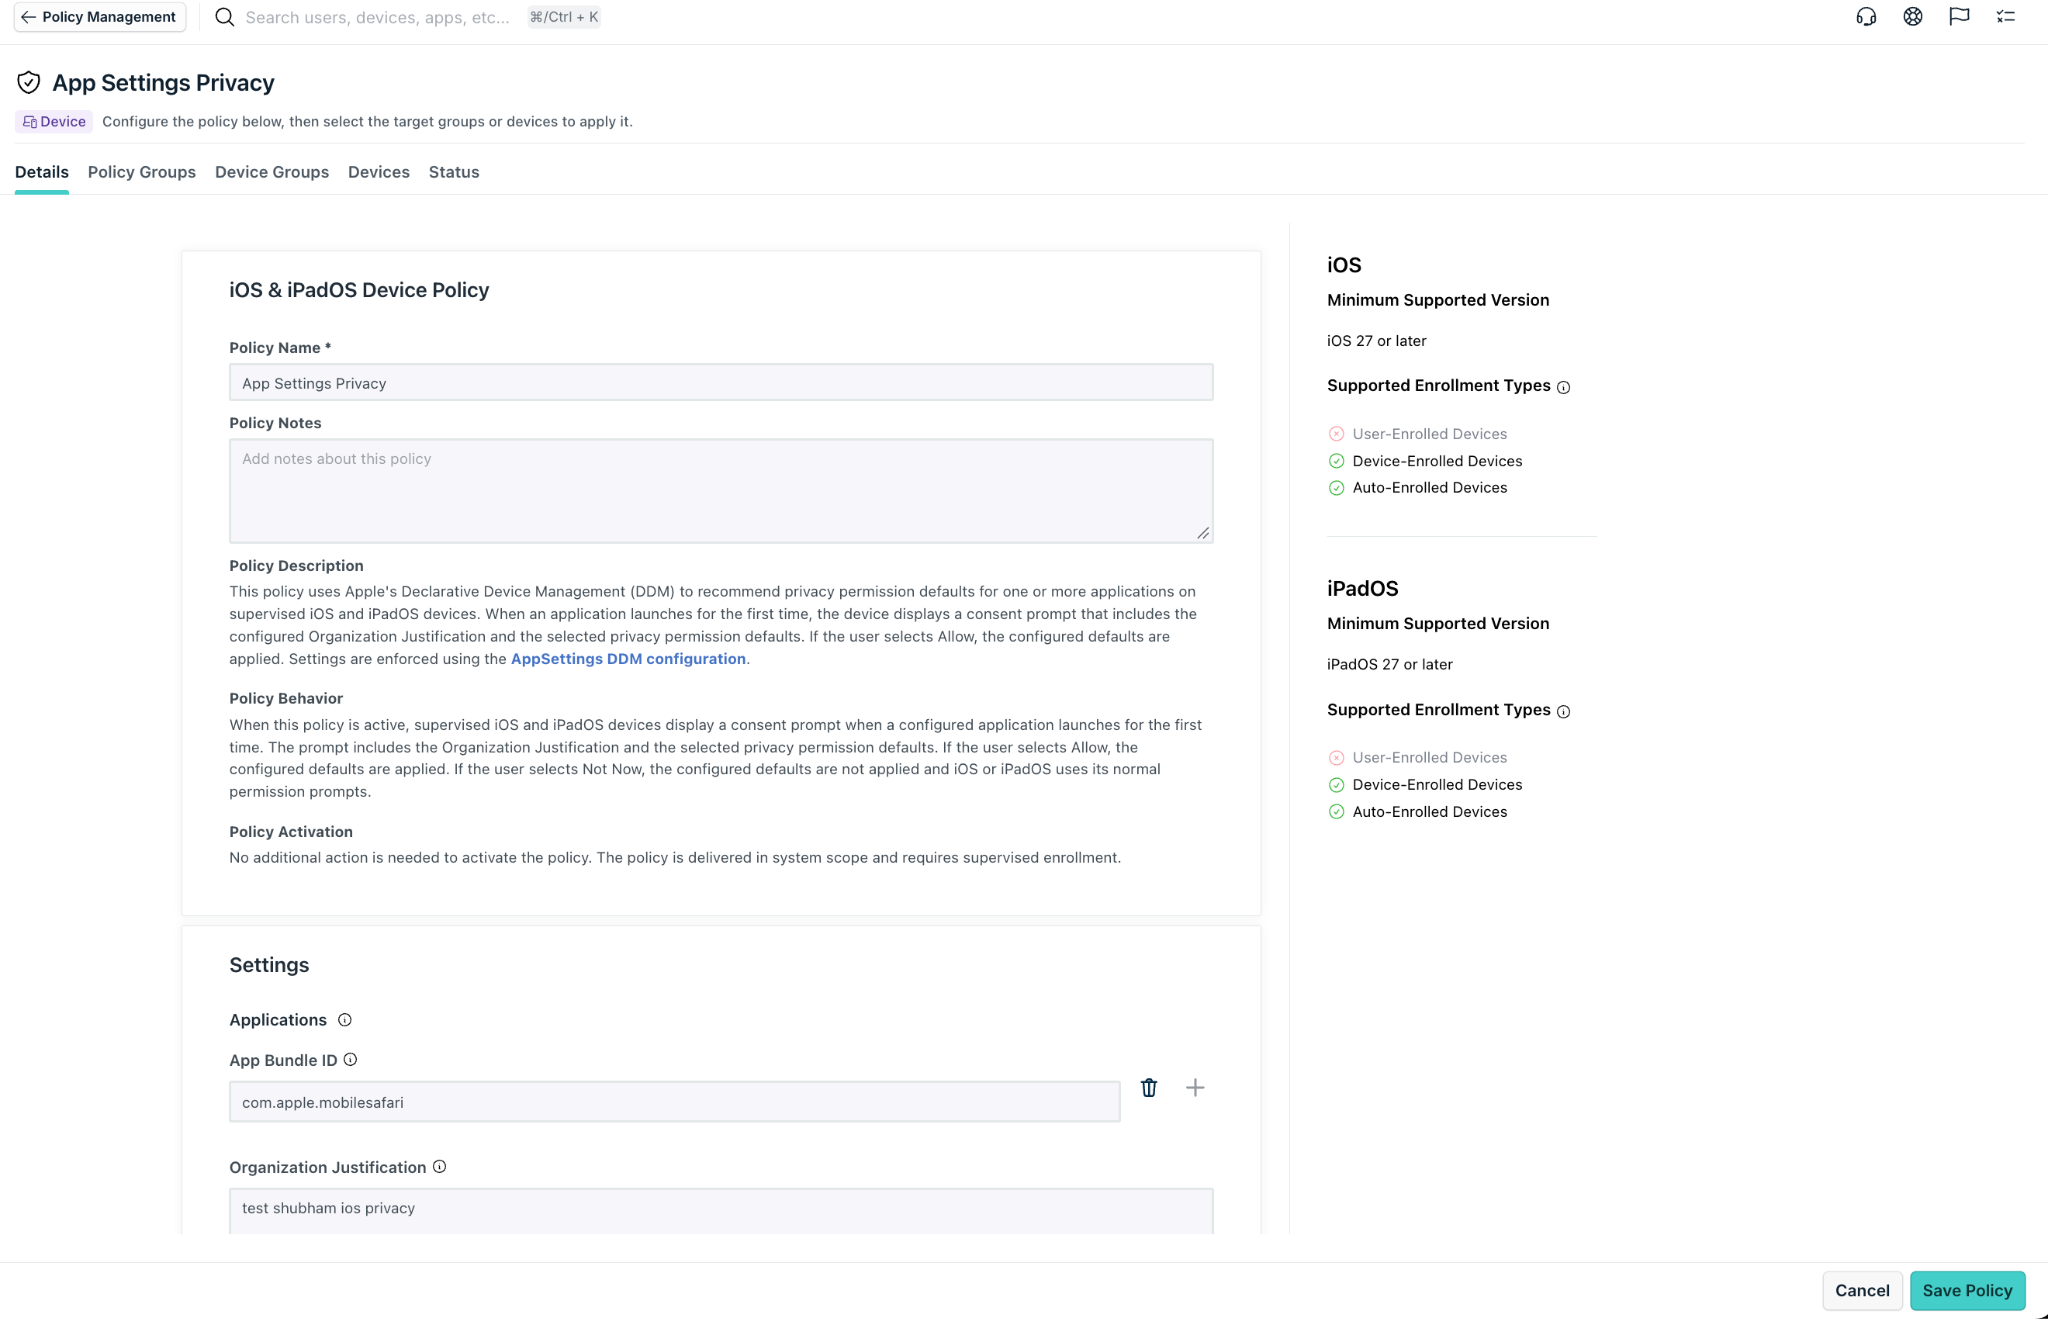
Configuring Applications
Adding an Application
- Click Add Application.
- A new application configuration is displayed.
- Configure the fields and privacy permission drop-downs for that application.
- (Optional) Click Add Application again to add another independent application configuration.
Each application has its own App Bundle ID, Organization Justification, and permission selections. Removing one application does not change the settings of another application.
Configuring Application Fields
| Field | Required | Description |
|---|---|---|
| App Bundle ID | Yes | The reverse-DNS identifier for the application. Helper text provides an example such as com.example.application. |
| Organization Justification | Yes | The organization's explanation for requesting the selected permission defaults. The device includes this text in Apple's consent prompt when the application launches. |
You cannot save the policy when Organization Justification is empty or contains only whitespace.
App Bundle ID Validation
JumpCloud validates each App Bundle ID before you can save the policy:
- The value cannot be empty.
- Leading and trailing whitespace is removed.
- Spaces are not permitted within the value.
- Only letters A-Z and a-z, numbers 0-9, hyphens (-), and periods (.) are permitted.
- The value must use reverse-DNS format with dot-separated components, such as
com.example.application. - The value cannot begin or end with a period.
- The value cannot contain consecutive periods.
- Empty components are not permitted.
- Bundle ID comparisons are case-insensitive.
- The same bundle ID cannot be added more than once in the policy.
If the value is invalid, JumpCloud displays:
Enter a valid App Bundle ID using reverse-DNS format, such as com.example.application. Use only letters, numbers, hyphens, and periods.
You cannot save the policy while an application contains an invalid or duplicate App Bundle ID.
Configuring Privacy Permissions
For each application, the following permission drop-downs are available. Free-form values are not accepted.
| Permission | Available values |
|---|---|
| Bluetooth | None, Allow |
| Camera | None, Allow |
| Dictation | None, Allow |
| Local Network | None, Allow |
| Location | None, While Using, Always |
| Location Accuracy | None, Approximate, Precise |
| Microphone | None, Allow |
At least one permission must be set to a value other than None. If an application has no effective permission selection, JumpCloud displays:
Select at least one privacy permission for this application.
Accessibility is not shown on the iOS and iPadOS policy. Apple supports that setting only on macOS.
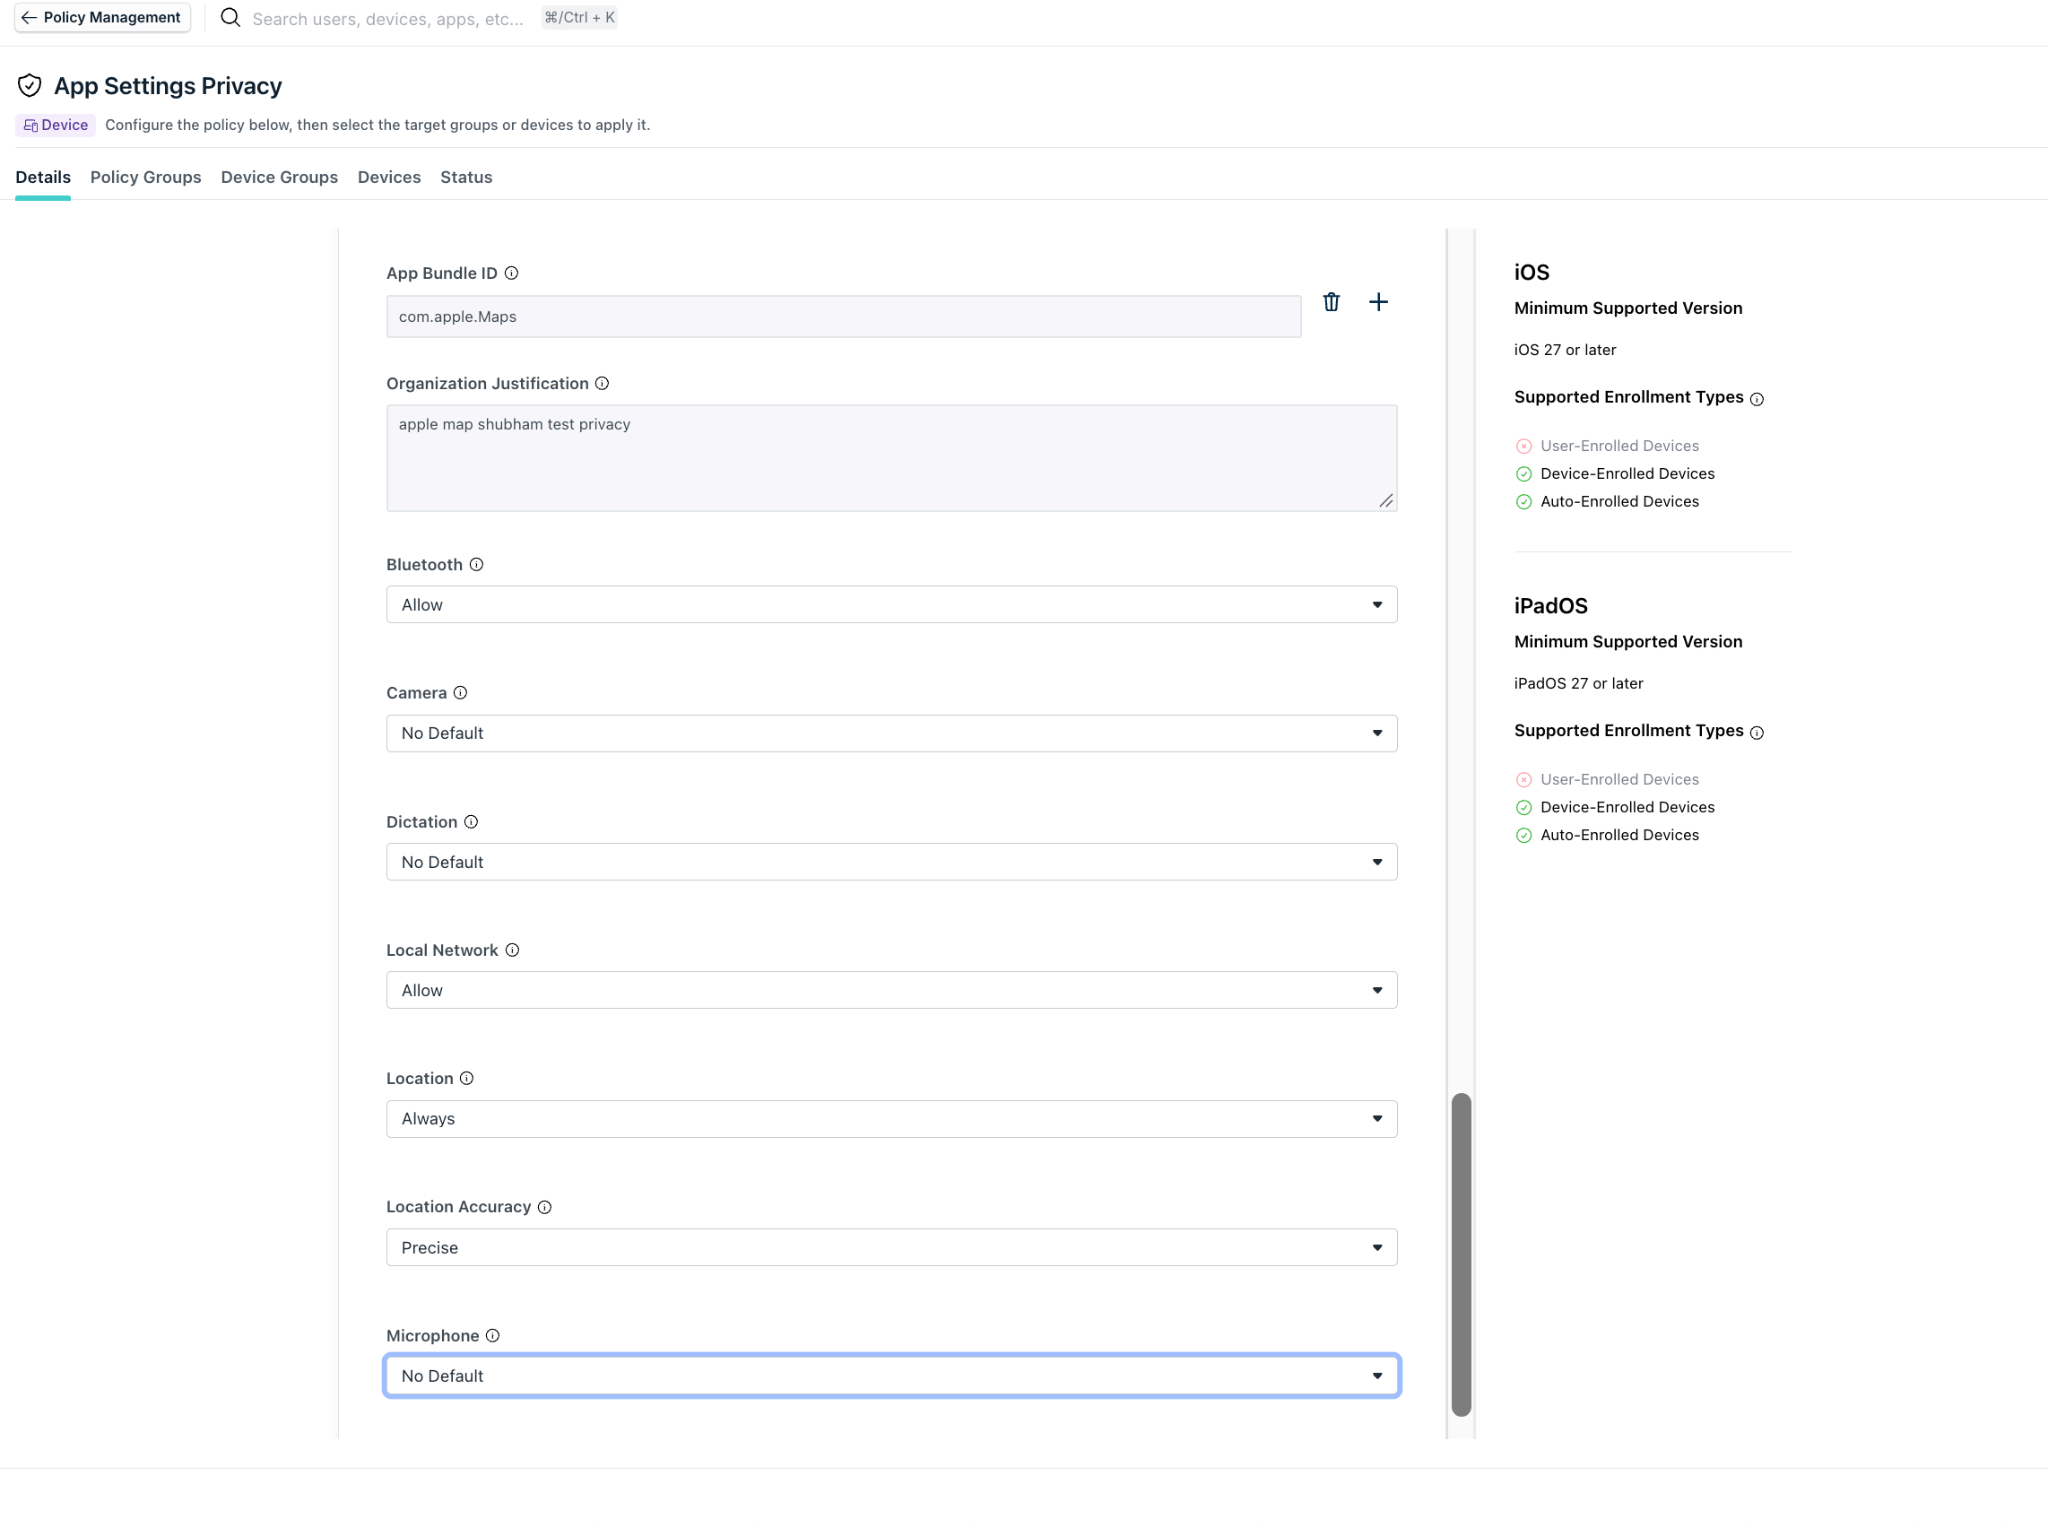
Removing an Application
Use the remove control on the application configuration you no longer need. Settings for other applications in the policy remain unchanged.
Applying the Policy
- (Optional) Select the Policy Groups tab and select one or more policy groups.
- Select the Device Groups tab and select one or more device groups where you want to apply this policy. For device groups with multiple OS member types, the policy applies only to supported, supervised iPhone and iPad devices enrolled in Apple MDM.
- Or select the Devices tab and select one or more devices.
- Click Create Policy. A success message is displayed when policy creation completes.
Viewing Policy Status
- Open the saved policy.
- Select the Status tab.
- Review results for assigned devices through the existing policy results workflow.
JumpCloud distinguishes unsuccessful outcomes such as unsupported OS, supervision issues, schema problems, and delivery errors from successful activation.
A successful activation result means the configuration was delivered. It is not proof that the User selected Allow on the consent prompt.
Was this information helpful?