Configure the Google Workspace Integration in the Enterprise Portal (Preview)
The next step in creating a secure and consistent connection between JumpCloud and Google Workspace is configuring the integration. You can control the user data that syncs, which platform should be the source (JumpCloud or Google), whether distribution groups are managed from JumpCloud, the email domains that are allowed to sync, and if there is a default domain that should be used.
Prerequisites
- A JumpCloud administrator account
- JumpCloud Device Package or higher
- An authorized and active Google Workspace instance
- Either a Google Super Admin (if you need to sync passwords for users with the Super Admin role) or a dedicated Google user for the integration with these roles:
- Groups Admin (pre-built role)
- Identity Management Admin (pre-built role)
- Custom role with ‘Domain Management’ admin API privileges
Using a person's Google user account for authorizing the integration may cause the integration to break if the person leaves the org or if the roles/ privileges change.
- You have read through the considerations in Get Started: Google Workspace Integration
Attribute Considerations
- The JumpCloud owned attributes (
email,firstname,lastname) are required by Google - When you connect that user to Google Workspace in JumpCloud – attributes in Google Workspace are automatically overwritten with data from JumpCloud. Further, any subsequent changes made to the user’s attributes in JumpCloud are automatically pushed to the corresponding attributes in Google Workspace
- If you choose to stop exporting data for an attribute, it is no longer synced with Google Workspace and subsequent changes made to that attribute in JumpCloud aren't exported to Google Workspace. It will not be modified or deleted in Google
- When syncing to a custom attribute in Google, ensure you are using the API
fieldName, not thedisplayNamefor that attributefieldNameanddisplayNameare initially the same. If the displayName doesn't match, the sync doesn't work.
Configure Google Workspace Domain(s)
Specify one or more domains as part of the integration configuration to have more granular control over which user accounts sync and how the translation rule for the email to User Principal Name (UPN) mapping is applied. There are three (3) possible configurations: no domains, a list of one or more domains but no default, and a list of one or more domains with one of those domains used as a default for the UPN translation rule. Each configuration is described in more detail below.
- If no domains are configured, the user’s company email is not checked and sent as is. The user syncs as long as their email domain matches one of the verified domains in the Google Workspace instance
- If one or more domains is configured and the No default option is selected, the user’s company email is checked against the domains listed. Only users with matching email domains are synced
- If one or more domains is configured and one of the domains is selected to Use as default, the user’s company email is checked against the domains listed
- If the domain matches one of the domains in the list, the email address is sent as is
- If the domain does not match one of the domains in the list, the email value sent as the Primary Email will be the username portion of the company email address and the default domain
Examples of how domains are used by the integration.
| Domains Configuration | Source email(JumpCloud Company Email) | Sync results | Primary Email value sent to Cloud Directory |
|---|---|---|---|
| No domains | user.test1@mydomain.com | Synced | user.test1@mydomain.com |
| user.test2@alternatedomain.com | Synced | user.test2@alternatedomain.com | |
| user.test3@otherdomain.com | Sync failed | user.test3@otherdomain.com | |
| Domains list = (mydomain.com, alternatedomain.com )&no default selected | user.test1@mydomain.com | Synced | user.test1@mydomain.com |
| user.test2@alternatedomain.com | Synced | user.test2@alternatedomain.com | |
| user.test3@otherdomain.com | N/A - user skipped | N/A | |
| Domains list = (mydomain.com, alternatedomain.com )&mydomain.com selected to use as default | user.test1@mydomain.com | Synced | user.test1@mydomain.com |
| user.test2@alternatedomain.com | Synced | user.test2@alternatedomain.com | |
| user.test3@otherdomain.com | Synced | user.test3@mydomain.com |
To add domains
- Log in to the EP.
If your data is stored outside of the US, check which login URL you should be using depending on your region. If your organization uses LDAP, RADIUS, or requires firewall allow list configuration, the Fully Qualified Domain Names (FQDNs) will also be region specific. See JumpCloud Data Centers for the URLs, FQDNs, and IP addresses.
- Go to Identity Management > Cloud Directories.
- Select the Google Workspace directory instance.
- Go to the Configuration tab > Google Workspace Domain(s) section, click Edit and then Add Domain.
- The first time you add a domain, you will be redirected to the authorization flow to approve the domains permission.
- If prompted, enter the email address for the Google Workspace admin account you want to use for the integration and the password for that account on the subsequent screen.
- Enter the password for that account if prompted.
If you enabled group management in this session, you will also see the group's permission in the list of permissions.
- Click Allow.
- You will be redirected back to the configuration page of for the Google Workspace integration
- Click the domain dropdown menu.
- Select one of the domains from the list.
The list is pulled dynamically from Google Workspace and only includes verified domains. The domain noted with (Primary), is the domain specified as the primary domain for that Google Workspace instance. That label is separate from the ‘Use as default’ option within the integration configuration in JumpCloud.
- Repeat steps 4-6 to add additional domains.
- Click Save.
To enable a default domain
- From the EP, go to Identity Management > Cloud Directories.
- Select the Google Workspace directory instance.
- In the Google Workspace Domain(s) section, select the radio button next to one of the domains to use that domain for the PrimaryEmail translation rule (default domain).
- Click Save.
Configure Organizational Units
Dynamically assign users to specific OUs based on their JumpCloud attributes, such as department, location, or role. This ensures automatic placement and their OU assignments remain accurate and up-to-date as your organization changes.
- From the Details tab, expand the Organization Units section.
- In OU Assignment and select one of the following radio buttons:
- Expression - enter an expression using
Expr - Custom Attribute - enter a custom attribute
- Expression - enter an expression using
- Click Preview to review the OU Assignment.
- If you do not select a specific user from the Preview Filter dropdown, the schema will default to the first user.
- If the preview looks correct, click Close.
- Click Save.
Configure User Attributes
Choose the optional user attribute mappings you want exported from JumpCloud to Google Workspace - First name, Last name, and Company email are the only required mappings with Google Workspace. This functionality allows you to centralize the management of these users.
Considerations
- If domains are used,
emailmapping should not be configured - After you select an attribute to export to Google Workspace, it will overwrite data for all Google Workspace users managed by JumpCloud. Resultingly, you could lose data stored for that attribute in Google Workspace
- See Impact of the user state and password settings for additional considerations when making selections for attribute mappings
To add user attribute mappings
The Export Attribute Mappings table lists the Required and Optional Mappings that JumpCloud sends to your Cloud Directory.
It's highly recommended you use all optional mappings. This creates a more complete user profile, enabling better automation and more accurate access management within the application.
Modifying User Attribute Mappings
-
From your Cloud Directory's Details tab, expand the Export Attribute Mapping section and click Edit.
-
Scroll to the bottom of the table and click +Add Attribute.
-
Select one of the mapping types:
- Direct Mapping (JSON Path) - send the value from a user attribute in JumpCloud directly to an attribute in the <Cloud Directory>
- From the JumpCloud Attribute dropdown, select the desired attribute
- If you choose “Custom User Attribute” you must type the name of the attribute exactly as it on the user details page. To see the dropdown again, you must delete the attribute and add a new attribute
- From the <Cloud Directory> Attribute dropdown, select the corresponding (destination) attribute
- From the JumpCloud Attribute dropdown, select the desired attribute
- Expression - transform or combine multiple user attributes into a single, custom value before sending it to the service provider
- Enter the expression in the JumpCloud Attribute field
- From the <Cloud Directory> Attribute dropdown, select the corresponding (destination) attribute
- Constant - send a fixed, predefined value—like a specific company name —for every user to the service provider
- This is a free text field with no validation, e.g., the attribute must match exactly, including case, to the corresponding attribute in the user record. Once the custom attribute is added, you must delete it and readd a new custom attribute to see the dropdown again.
- Direct Mapping (JSON Path) - send the value from a user attribute in JumpCloud directly to an attribute in the <Cloud Directory>
-
Repeat these steps for additional attributes.
-
Click Preview Mappings to review the User Schema.
- If you do not select a specific user from the Preview Filter dropdown, the schema will default to the first user.
-
Click Update.
Updates to the user schema will not dynamically sync. To force a sync, you must modify the user group’s record in some way, like adding a space to the Description field.
To modify existing user attributes
This enhancement gives you complete control over the user attributes sent from JumpCloud to this application. You can now:
Fully control mappings - define which JumpCloud attribute or source data corresponds to an attribute in the SP's SCIM schema
- Use a variety of source values - map data from the user's standard attributes, Manager field, custom attributes, or other data sources
- Manipulate data with expressions - transform data, such as preferred first names and date format, using expressions before transmission to the SP. Learn more
- Preview changes - review your new mappings to ensure accuracy before you save
- From your Cloud Directory's Details tab, expand the Export Attribute Mapping section and click Edit.
- For the type of attribute you would like to modify:
- Direct - select the new attribute from the dropdown(s)
- Expression - click in the Expression field and make the desired edits. If necessary, select the new attribute from the <Cloud Directory> Attribute dropdown
- Custom - delete the existing values in either or both of the attribute fields and enter the new values
- Click Preview Mappings to review the updated User Schema.
- Click Update.
Updates to the user schema will not dynamically sync. To force a sync, you must modify the user group’s record in some way, like adding a space to the Description field.
To delete user attributes
- From your Cloud Directory's Details tab, expand the Export Attribute Mapping section and click Edit.
- Click Delete (
 ) to remove any optional attributes.
 - When finished, click Update.
Attributes that were initially included and populated in the user record and then deleted at a later time will not be modified or removed from the user record.
To restore the default Optional Mappings, click Edit > Restore Defaults > Update.
Google Export Attribute Mappings
The following table outlines how attribute data is exported from JumpCloud to Google Workspace's. The attribute listed in the JumpCloud Attribute column is synced to the attribute listed in the Google Attribute column. See Expression Descriptions for a more detailed descriptions of the expressions used in the table below.
| JumpCloud Attribute | Google Attribute Name |
|---|---|
| Required Mappings | |
| primaryEmail | |
| firstname | name.givenName |
| lastname | name.familyName |
| Optional Mappings | |
| addresses.home | addresses.home |
| addresses.work | addresses.work |
| costCenter | organization.costCenter |
| department | organizations.department |
| employeeType | organizations.description |
| get(jcUser, 'suspended')==true | |
| job.Title | organizations.title |
| mergeEmails(gappsUser.emails, [{ type: "other", address: get(jcUser, "emails") | first() ?? {} |
| mergeExternalIds(gappsUser.externalIds,[{type: "organization", value: jcUser.employeeIdentifier, forceSendFields: ["Value"]}]) | externalIds |
| mergeRelations(gappsUser.relations, [{type: "manager", value: jcUser.managerEmail}]) | relations |
| notNullOrEmpty(jcUser.displayname) ? jcUser.displayname : trim(join(filter([jcUser.firstname, jcUser.lastname], notNullOrEmpty(#)), ' ')) | name.displayName |
| password | password |
| phoneNumbers.home | phones.home |
| phoneNumbers.mobile | phones.mobile |
| phoneNumbers.work | phones.work |
| phoneNumbers.work_fax | phones.work.fax |
| phoneNumbers.work_mobile | phones.work_mobile |
Expression Descriptions
get(jcUser, 'suspended')==true || get(jcUser, 'state') == 'SUSPENDED'
get(jcUser, 'suspended') == true- checks if the 'suspended' property of thejcUserobject is equal totrue||- logical OR operator. The entire expression will be true if either the first condition or the second condition (or both) are trueget(jcUser, 'state') == 'SUSPENDED'- checks if the 'state' property of thejcUserobject is a string with the value 'SUSPENDED'
Checks if a user is suspended, using two different possible flags that might exist in the user data.
mergeEmails(gappsUser.emails, [{ type: "other", address: get(jcUser, "emails") | first() ?? {} | get("address")}])
mergeEmails(gappsUser.emails, […])- the core function call that takes two arguments:gappsUser.emails- the original array of email addresses belonging to thegappsUserobject[…]- this is the new email object that will be added to the array
[{ type: "other", address: … }]- the new email object being created. It's an array with a single element, which is an object with two properties:type: "other"- assigns the type of the new email address as "other."address: …- where the email address string will be placed
get(jcUser, "emails")- retrieves the array of emails from thejcUserobject. Theget()function is often used to safely access a property| first()- the pipe operator passes the result of the previous operation (thejcUseremails array) to the next function,first(). This function takes an array and returns its first element?? {}- the nullish coalescing operator. If the result offirst()isnullorundefined, it will use an empty object{}instead. This prevents an error from occurring in the next step if the jcUser has no emails.| get("address")- the final part takes the first email object fromjcUserand retrieves its address property, which is the actual email address string
Takes the very first email address from the JumpCloud user and creates a new "other" email and then merges it into the corresponding Google user's existing list of emails.
mergeExternalIds(gappsUser.externalIds,[{type: "organization", value: jcUser.employeeIdentifier, forceSendFields: ["Value"]}])
mergeExternalIds(…)- the main function call. It's designed to take a list of existing external IDs and a new ID to add or updategappsUser.externalIds- the first argument, an array of external identifiers already associated with thegappsUseraccount[{…}]- the second argument, an array containing the new external ID object to be mergedtype: "organization"- specifies the type of the external ID. In this case, it's categorized as an "organization" ID.value: jcUser.employeeIdentifier- sets the actual value of the new external ID. The value is being pulled from theemployeeIdentifierproperty of thejcUserobjectforceSendFields: ["Value"]- a specific instruction to the API or system receiving this data. It tells the system to explicitly send and update theValuefield, even if it might be considered empty or unchanged. This is often used to ensure a field is properly cleared or updated to a new value
Synchronizes an employee identifier between Google and JumpCloud.
mergeRelations(gappsUser.relations, [{type: "manager", value: jcUser.managerEmail}])
mergeRelations(…)- the function that handles the merging of relation data. It takes two arguments: the user's existing relations and the new relation to be addedgappsUser.relations- the first argument, an array of existing relationships associated with thegappsUserobject. These relations might include other roles like "assistant" or "peer."[{…}]- the second argument, an array containing the new relation object. This is a common way to pass a new item to be added to a listtype: "manager"- specifies the type of the new relation. In this case, it identifies the relationship as a "manager."value: jcUser.managerEmail- is the value of the new relation. The value is being pulled from themanagerEmailproperty of thejcUserobject, which is likely a different system's representation of the user. This expression effectively links the gappsUser to their manager by using the manager's email address as the identifier
Adds a manager to a user's relations list.
notNullOrEmpty(jcUser.displayname) ? jcUser.displayname : trim(join(filter([jcUser.firstname, jcUser.lastname], notNullOrEmpty(#)), ' '))
notNullOrEmpty(jcUser.displayname)- checks if thedisplaynameproperty of thejcUserobject is not null or empty. If this condition istrue, it means a display name is already providedjcUser.displayname- if true, the expression returns the existingjcUser.displaynametrim(join(filter([jcUser.firstname, jcUser.lastname], notNullOrEmpty(#)), ' '))- If the initial condition is
false(meaningdisplaynameis null or empty), the expression moves to this part to create a display name. filter([jcUser.firstname, jcUser.lastname], notNullOrEmpty(#)- filters an array containing the user'sfirstnameandlastname. The filter removes any elements that arenullor empty. For example, iffirstnameexists butlastnamedoesn't, the array becomes['John'].join(…, ' ')- takes the filtered array and joins its elements together with a space in between. For instance,['John', 'Doe'] becomes'John Doe'.trim(…)- function that removes any leading or trailing whitespace from the resulting string. This ensures the name is clean, especially if one of the original name parts was empty.
- If the initial condition is
Checks if a user's display name exists and, if not, it creates one from the user's first and last names.
Configure User Password Settings
In the EP, there are Password Configuration Settings that allow you to customize what happens to a user’s account in Google Workspace when their JumpCloud password gets locked out or expires. These settings are impacted by your selections for password and user state attributes in the Attribute mapping and settings section.
To access the Password Configurations settings
- From the EP, go to Settings > Security > Password Configurations > Google Workspace.
- Under your Google Workspace instance, select your desired options for Password Expiration and Account Lockout.
- After any changes are made, click Save.
Impact of the user state and password settings
The table below shows how the settings for password and user state attributes impact the Password Configurations settings for password expiration and account lockout.
| Password attribute setting | User State setting | Default Password Expiration setting | Default Account Lockout setting | |||
|---|---|---|---|---|---|---|
| Maintain Users | Suspend Users | Remove Access | Maintain Users | Suspend Users | ||
| Exclude | Export, Import, or Exclude | ✅ | ✅ | |||
| Export | Export | ✅ | ✅ | |||
| Import or Exclude | ✅ | ✅ | ||||
Configure Google Workspace Group(s) Management
The integration supports the creation and management of distribution groups in Google Workspace from JumpCloud. This functionality allows you to centralize the management of these groups and group memberships in JumpCloud.
Considerations
- After you enable group management, changes made to groups in JumpCloud are synced to distribution groups in Google Workspace. Changes only sync from JumpCloud to Google Workspace. Changes made to groups in Google Workspace aren’t synced to JumpCloud
- If you disable group and membership management, no further changes will be made to distribution groups in Google Workspace. The groups will remain exactly as they were at the time the functionality was disabled
- It can take some time for new groups to appear in the Google Groups directory. See Google’s Admin Help: New groups don’t show up in Groups directory
- Managing a Google dynamic group from JumpCloud is not supported. Making manual changes to members of a Google dynamic group is not allowed and will fail with an
Error 412: Condition not met, conditionNotMeterror.- You can sync a JumpCloud dynamic group to a static group in Google
- If you have a group in JumpCloud with the same name and email as a dynamic group in JumpCloud, do not add the email for the group in the Users Group tab to prevent group memberships errors
To enable Google Workspace group management
- Go to Identity Management > Cloud Directories.
- Select the Google Workspace directory you want to manage groups for.
- In the Google Workspace Sync section of the Details tab, select Enable management of groups and memberships in Google Workspace.
- Click Save.
- If you have not already granted the groups permission, you will be redirected to the Google Workspace authorization flow.
- Enter the email address for the Google Workspace admin account you are using for the integration if prompted.
- Enter the password for the Google Workspace admin account you are using for the integration if prompted.
- Click Allow.
After you enable group management for your Google Workspace directory sync integration in JumpCloud, you must add the email attribute for user groups bound to that Google Workspace directory. If you don't add an email address to these groups, users in bound groups could be suspended until one is added.
To specify Distribution Groups
Considerations
- If you remove a distribution group’s email address, the group and its memberships are no longer synced with Google Workspace
- If you change a distribution group’s email address, the members of the group are moved to the distribution group of the email address you specify
To specify a Google Workspace Distribution Group
Ensure that Enable management of groups and memberships in Google Workspace is enabled in your Google Workspace Integration.
- Go to Identity Management > Cloud Directories.
- Select the Google Workspace directory to which you want to manage groups.
- Select the User Groups tab.
- In your desired group, add an email address in the Distribution Group Email field.
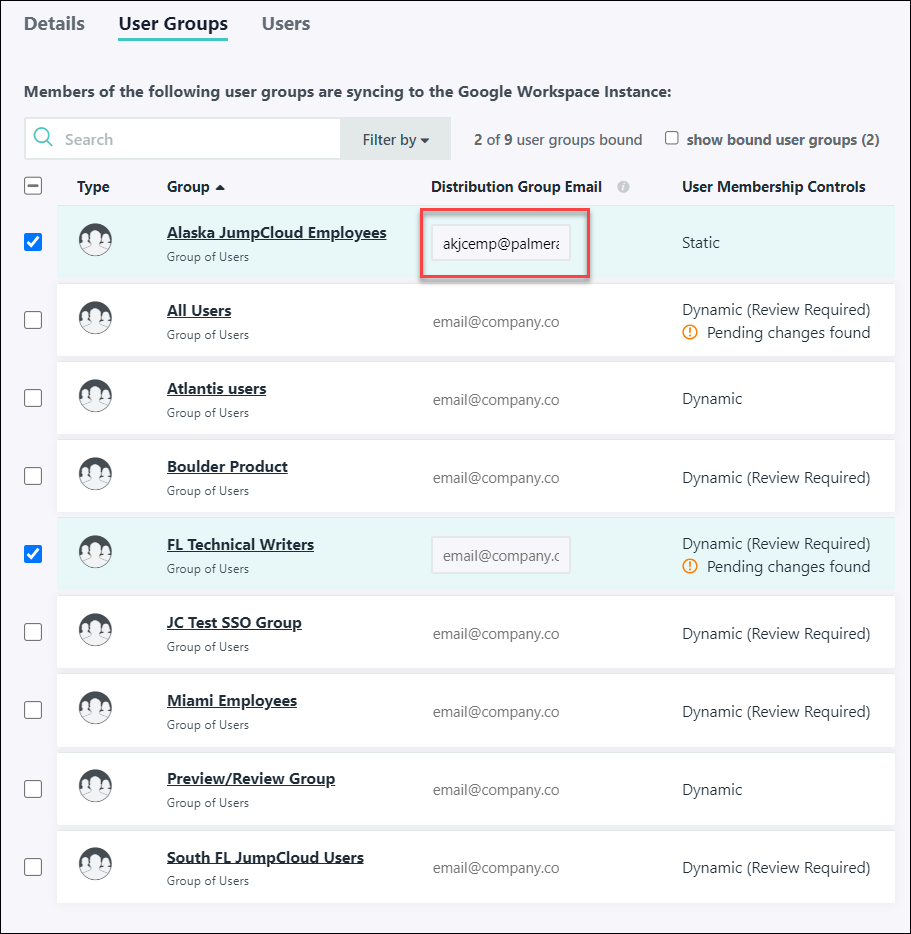
- Click Save.
When you associate JumpCloud user groups to a Google Workspace directory, users in those groups are added to those same distribution groups in Google Workspace. Distribution group membership, in addition to user attributes and passwords, will be synced. See Giving JumpCloud Users Access to Google Workspace to learn how to associate user groups to a Google Workspace Directory.
Was this information helpful?