Configure Custom Risk Policies
Access Risk Detection evaluates every login event in your org against a set of risk factors and assigns a risk score and severity level. Custom Risk Policies let you apply different risk factor configurations to different parts of your organization instead of one org-wide setting. You create a named policy, choose which risk factors it evaluates and how much each factor contributes to the score, and associate the policy with User Groups, JumpCloud Admin and User Portals, and Single Sign-On (SSO) applications. Every login event is still evaluated: events that match no custom policy fall through to the system-managed Default Policy.
Policy scope is limited to User Groups, JumpCloud Admin and User Portals, and SSO applications. You choose which factors run and how much each one contributes. Custom Risk Policies also does not add new risk factors; it scopes and tunes the existing set. See Understand Access Risk Factors for the full factor list.
Risk level thresholds are a single global setting that applies to every policy, so they are not configured per policy. The Default Policy is permanent and cannot be deleted, which guarantees that every login event always has a policy to fall back on.
With the Custom Risk Policies feature, the Risk Factors section from the Access Risk Configuration page is moved to the Default Policy.
Prerequisites
- Access Risk Detection must be enabled on the Access Risk Configuration page. Enabling it provisions exactly one Default Policy for your org. See Configure Access Risk Detection to learn more.
- The User Groups and SSO applications you want to associate with a policy must already exist in your org.
- An Admin account with permission to manage risk policies.
Considerations
- Risk factor controls move to the policy detail page. When Custom Risk Policies are available in your organization, the risk factor controls that were on the Access Risk Configuration page are configured on individual policy detail pages instead. The remaining configuration settings stay on the Configuration page and continue to work as before.
- Only one policy is applied per login event. When several policies match the same event, the highest-ranked matching policy is the only one applied.
Understanding How Policies Are Applied
Matching a Login Event to a Policy
A custom policy matches a login event only when all applicable conditions match:
- The login type is included in the policy’s login resources.
- The user belongs to a group associated with the policy, unless the policy applies to all user groups.
- For an SSO login, the application is associated with the policy, unless the policy applies to all applications.
If multiple custom policies match, only the highest-priority policy is evaluated. Its result is final, whether normal or risky. If no custom policy matches, the Default Policy is evaluated.
Because only the highest-ranked matching policy is applied, risk factor settings are not merged across matching policies. Review your policy order whenever you add or change a group or application association.
Understanding the Default Policy
The Default Policy is a system-managed policy that reflects the original org-wide Access Risk configuration. It covers every user and application not matched by a custom policy, which means every login event has scoring coverage even when you have created no custom policies.
The Default Policy behaves differently from a custom policy:
| Action | Default Policy | Custom policy |
|---|---|---|
| Enable or disable risk factors | Available | Available |
| Associate User Groups | Applies to all user groups | Available |
| Associate SSO applications | Applies to all applications | Available |
| Change precedence | Not available — always ranked lowest | Available |
| Delete | Not available | Available |
In an organization with no custom policies, the policy list shows the Default Policy only.
Accessing Custom Risk Policies
- Log in to the JumpCloud Admin Portal.
- Go to Monitoring > Access Risk > Policies.
The policy list is displayed, showing every policy with its name, precedence position, associations, and 30-day applied event count. The Default Policy appears exactly once and is always ranked lowest.
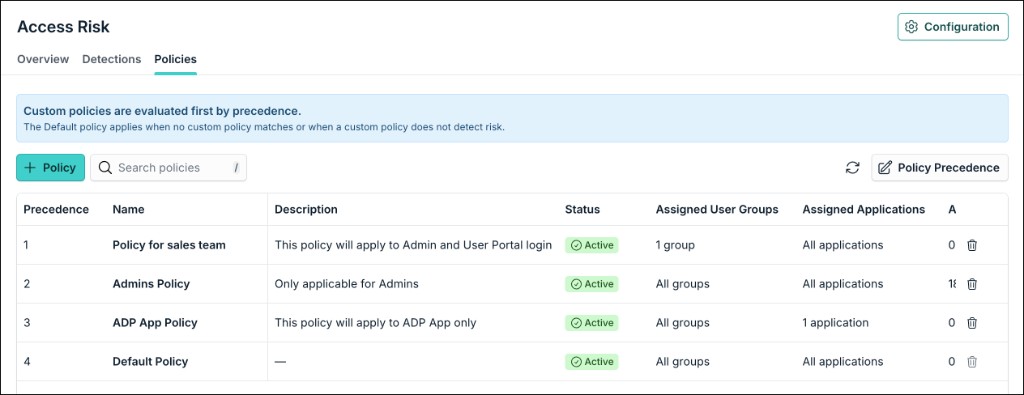
Creating a Custom Risk Policy
- Log in to the JumpCloud Admin Portal.
- Go to Monitoring > Access Risk > Policies.
- Click the + policy button.
- Enter the policy name and description.
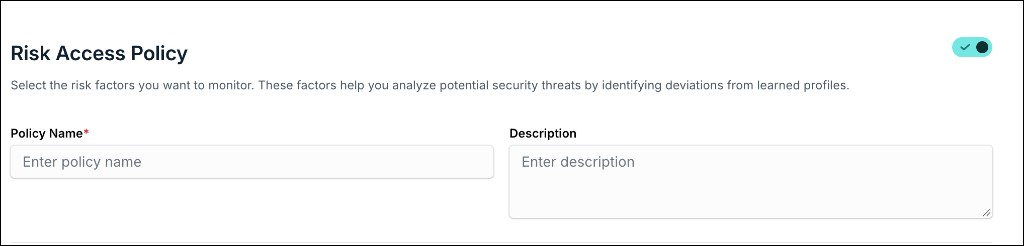
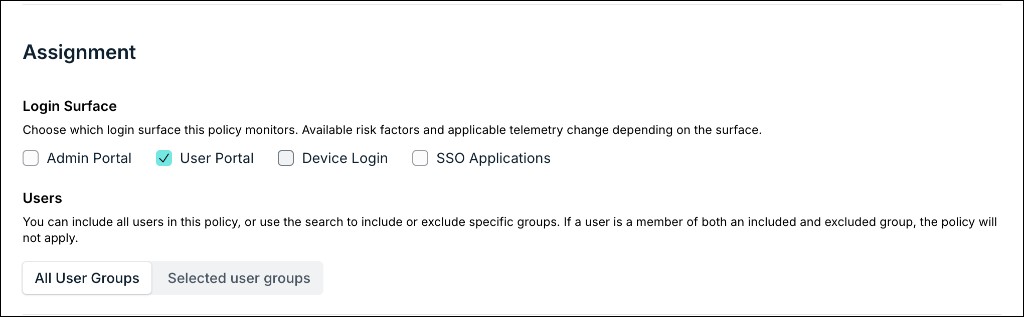
- Select the appropriate login surface for this policy to monitor. Add one or more SSO applications, users, or user groups for the policy.
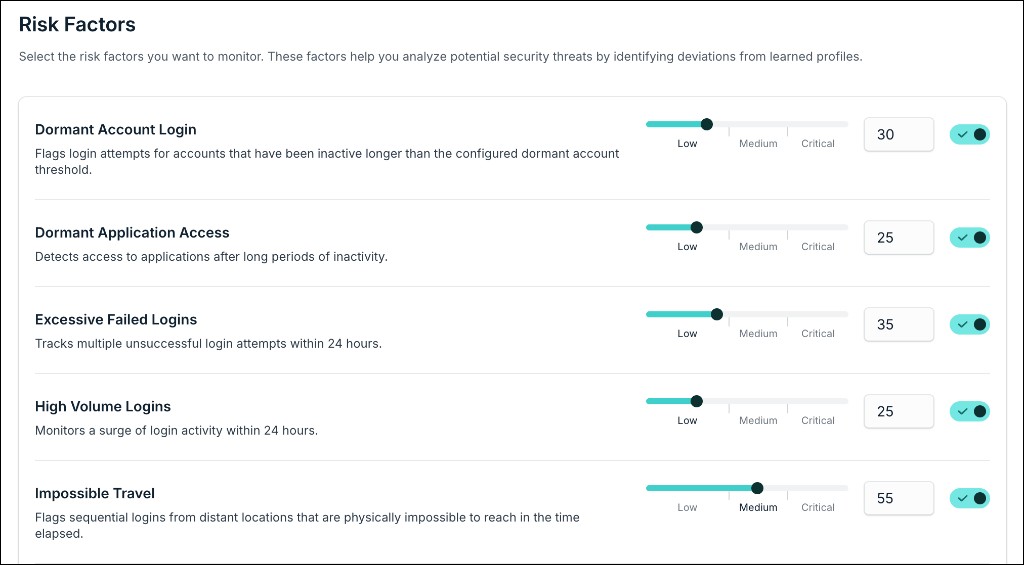
- Configure the risk factors for this policy. See Configuring Risk Factors in a Policy below.
- Make sure the toggle button at the top is turned on so this policy is enabled.
The policy appears in the list at a default precedence position that you can change later. Subsequent login events that match the policy are evaluated under it.
Editing a Custom Policy
- On the policy list, click the policy you want to edit.
- Change the risk factor settings, the user group associations, or the SSO application associations.
- Click Save.
Editing a custom policy does not change the Default Policy or any other policy.
If two Admins edit the same policy at the same time, the second save is warned of a conflict and must reload the policy before overwriting. Avoid editing the same policy in multiple browser tabs.
Configuring Risk Factors in a Policy
Each policy contains a section for every Access Risk risk factor. See Understand Access Risk Factors for what each factor detects and when it triggers.
For each risk factor you can:
- Enable or disable the factor: A disabled factor contributes nothing to the score for events evaluated under this policy. Disabling a factor does not change detections that already exist.
- Set the factor’s score contribution: A slider controls how much the factor contributes when it triggers. The control shows both the qualitative and the underlying numerical score.
The score slider control loads with the original Access Risk baseline value for that factor. If you enter a value outside the allowed range, you can’t save it and the valid range is displayed.
Disabling a factor or lowering its score on a policy associated with a broad User Group reduces detection coverage for every user in that group. Review the 30-day coverage count and the Directory Insights audit log after changes that loosen detection.
If you disable every risk factor in a policy, events evaluated under that policy score to the lowest level. This is expected behavior, not an error.
Setting Policy Precedence
Precedence determines which policy is applied when a login event matches more than one. Every policy in the list has a visible, unambiguous precedence position.
- Log in to the JumpCloud Admin Portal.
- Go to Monitoring > Access Risk > Policies.
- In the upper right corner, click Policy Precedence.
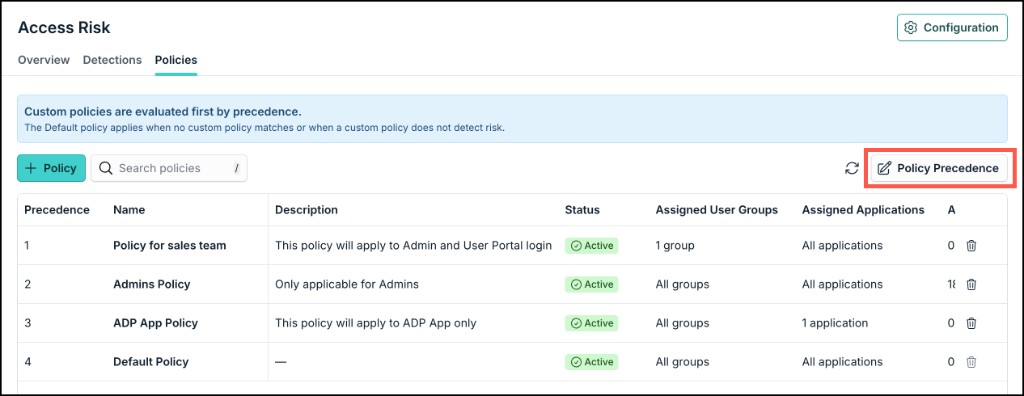
- Drag the policy row to its new position in the list.
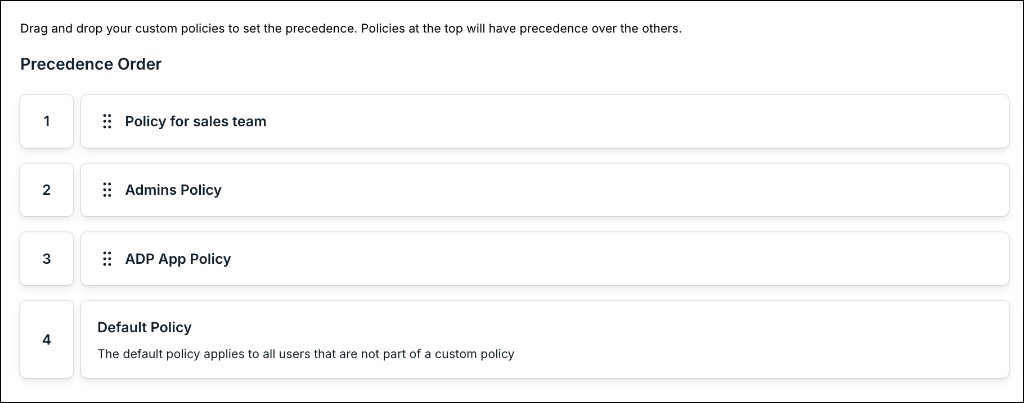
- Click Save.
The new order persists across page refreshes and new sessions, and subsequent login events use it. Reordering policies does not change any policy’s risk factor settings or associations.
Keep the following in mind when reordering:
- The Default Policy remains lowest ranked. Moving it above a custom policy is prevented.
- Canceling a reorder restores the previous order.
- Unsaved order changes are lost if you refresh the page.
- If a save fails, an error is displayed and the last saved order is kept.
Configuring Risk Level Thresholds
Risk level thresholds define how a summed risk score maps to a severity level. They are a single global setting applied to every policy, including the Default Policy, rather than a per-policy setting. The thresholds determine the severity shown for both risk events and individual risk factors.
- Log in to the JumpCloud Admin Portal.
- Go to Monitoring > Access Risk. Then click Configuration.
- Under Custom Severity Scoring, enter the score limits for each severity level.
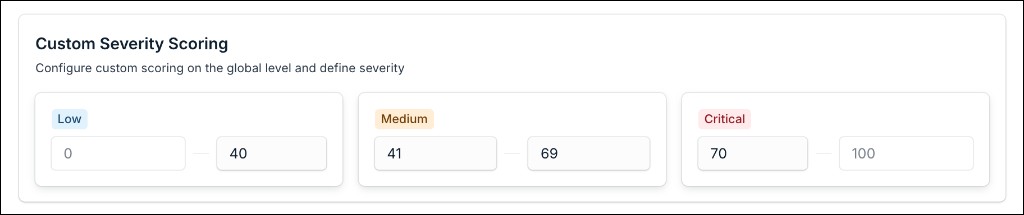
- Click Save.
Subsequent login events across all policies are classified using the updated bands.
The bands load with the original Access Risk baseline values. Bands must be ascending and must not overlap; if they do, the save is rejected and a message indicates that the bands must be non-overlapping and ascending.
Because per-factor scores are set per policy, two policies can produce different summed-score ranges while sharing the same global bands. Review the severity distribution on the Detections page after you change either per-factor scores or the bands.
Reviewing Policy Coverage
The policy list shows a 30-day count of the login events each policy was applied to. Use it to find policies that are unused, too narrow, or ranked lower than intended.
- A newly created policy displays a count of 0 rather than a blank value.
- The count increments only for the policy that was actually applied to an event. Lower-precedence policies that matched are not counted.
- A count of 0 on an established policy indicates that its associations are too narrow or that a higher-ranked policy is including the events.
Reviewing the Applied Policy on a Detection
Each detection identifies the policy that produced its score, so you can trace a finding back to the configuration that created it.
- Log in to the JumpCloud Admin Portal.
- Go to Monitoring > Access Risk and click the Detections tab.
- Click a detection to open its detailed view.
- Review the applied policy alongside the existing detection detail — the risk score, the severity level, and the risk factors that triggered.
- Click the policy name to open that policy and review or change its configuration.
Detections produced under the Default Policy identify the Default Policy explicitly. See Review and Resolve Detections to learn more about working with detections.
Auditing Policy Changes
Every policy change is recorded in Directory Insights with the actor, the timestamp, the policy name and ID, and the configuration values before and after the change. Security and compliance teams can use these entries as change-control evidence.
The following event types are recorded:
| Event type | Recorded when |
|---|---|
access_risk_policy_created | An Admin creates a policy |
access_risk_policy_updated | An Admin changes a policy’s risk factors, score values, or associations |
access_risk_policy_deleted | An Admin deletes a custom policy |
access_risk_policy_order_updated | An Admin updates the policy order |
To review them, filter Directory Insights for risk policy events over the date range you need, then export the filtered results. See Directory Insights to learn more.
Examples of Custom Risk Policies
Admin Portal Logins
If you have a user group called JumpCloud Administrators and want to apply stricter risk scoring to its Admin Portal logins, create a policy named Admin Portal – Administrators. Select Admin Portal as the login surface and JumpCloud Administrators as the user group. Increase the contribution of applicable factors such as an unfamiliar browser, unusual location, or impossible travel. Admin accounts have a larger potential blast radius, so these signals may warrant greater weight. Confirm that your admin identities can be targeted through this group selector.
Sensitive Application for All Users
If you use Workday for payroll and want closer scrutiny of every Workday login, create Workday – All Users. Select SSO Applications, All User Groups, and Workday. Tune applicable unfamiliar device or unusual location factors. A Workday login can match this policy regardless of the user’s group; a login to another application does not.
Specific Group Accessing a Specific Application
If you have a user group called Finance and want custom risk scoring when its members access Salesforce, create Finance – Salesforce. Select SSO Applications, the Finance group, and Salesforce. Both conditions must match: a Finance member signing in to Salesforce is in scope, while a Sales member signing in to Salesforce or a Finance member signing in to Workday is not.
User Portal Logins
If you have a group called Call Center Agents whose members usually connect through predictable corporate networks, create Call Center – User Portal. Select User Portal and Call Center Agents. Consider enabling or increasing the contribution of Unusual ASN, if available for this login surface. Review the resulting detections before using similar settings for employees who regularly work from varied networks.
Device Logins
If you have a group called Field Operations and want to tune risk scoring for its device logins, create Field Operations – Device Login. Select Device Login and Field Operations, then configure factors supported for device-login events, such as excessive failed logins if available. A device login by a member can match; the same member’s SSO login does not match this device-only policy.
Was this information helpful?