JumpCloud’s Multi-Tenant Portal (MTP) centralizes the control and management of multiple organizations from one dashboard. The MTP enables Managed Service Provider (MSP) admins to do their work more efficiently, from a single, browser-based portal. MSP admins can view top-level data for their managed organizations at-a-glance. They can also securely launch full management sessions from the MTP for any organization they administer.
Prerequisites:
- If you’re not a partner, contact [email protected].
Considerations:
- All admin accounts for your MSP organization’s MTP have access to all of your MSP managed organizations.
- At this time the MTP doesn’t support granular permissions; you can’t restrict access per MSP admin account or per organization.
- Existing organizations aren’t automatically added to your MSP organization’s MTP when it’s activated. You need to ask JumpCloud Support to add existing organizations to your MSP organization’s MTP.
- Admin accounts for your MSP organization’s MTP are automatically given access to organizations created in the MTP Dashboard.
Multi-Tenant Portal
To access your MSP organization’s MTP:
Use the account credentials of an MSP admin account to log in to the JumpCloud Admin Portal: https://console.jumpcloud.com.
Your MTP Dashboard has eight main tabs:
- Home
- General overview of your organizations and users
- Organizations
- Create, launch, view, and manage your organizations
- Users
- View all existing users, add new, or perform a variety of other actions for users
- Devices
- View all existing devices, add new, or perform a variety of other actions for devices
- Administrators
- View, create, suspend, and delete admin accounts
- Activity
- View and download activity insights for your MTP
- Account
- View and manage the account overview, payment history, billing information, and usage
- Integrations
- Configure integrations from a list a supported options, request new integrations, and sign up for beta
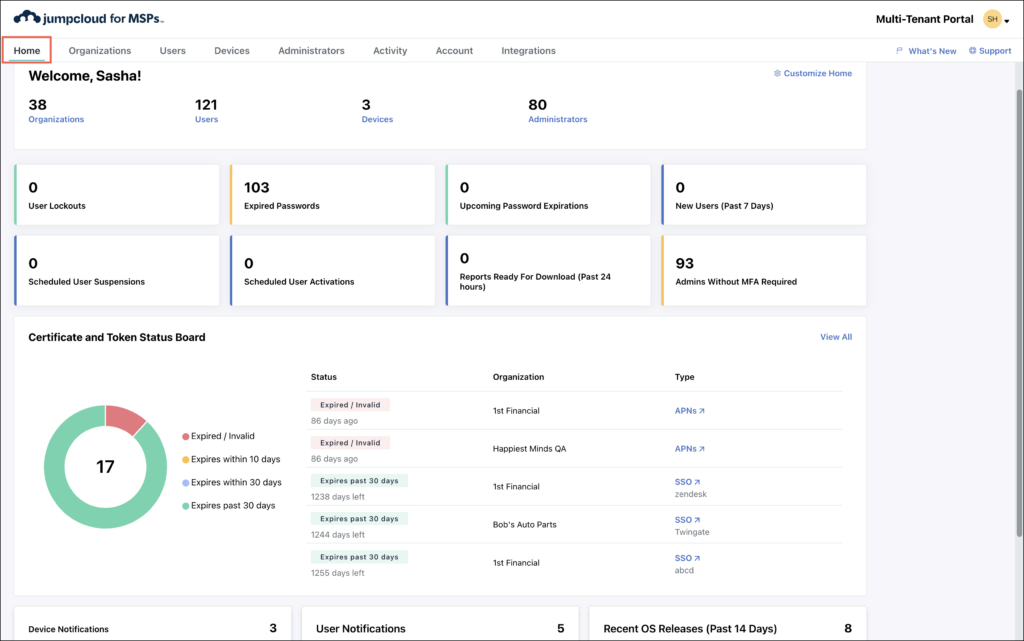
Home Tab
The Home tab to view information about the organizations and users you administer. You can view information about your MSP organization’s user data including User Lockouts, Expired Passwords, Upcoming Password Expirations, New Users (Past 7 Days), Devices Inactive Greater Than 7 Days and more.
To use the Home tab, see MTP Homepage.
Organizations Tab
To use the Organizations tab:
- Once logged into the MTP, click on Organizations.
- Add a managed organization to your MSP organization’s MTP by clicking the plus icon ( + ) in the left corner or search for an existing one.
- Click on the Organization Name to see the following details for that managed organization:
- An overview of your Current Users and Users Last Month, which is used to help determine your billing.
- Your company logo, see Upload a Logo for Your Organization for more information.
- View your Provider ID by clicking the eye icon. Save it to your clipboard by clicking the copy icon.
- Change your Organization Name* if needed.
- View and delete Admins from the organization by clicking the trashcan icon.
- Click Save for any changes.
- Information is organized into columns displaying Current Users, Devices and Applications you have in each organization.
- Click Launch to open the Admin Portal for that managed organization.
- Click on your initials in the top right corner to open the MTP more actions menu.
- From here you can either Submit An Idea or Logout. Learn more about filling out the Submit An Idea form.
- View your Provider ID by clicking the eye icon. You can save the Provider ID to your clipboard by clicking the Copy icon.
Users Tab
Admins can see all of the users they manage across all tenant orgs in the MTP, and quickly take action to resolve any issues. You can filter by User State, Organization, or Role to quickly see which users need help and select from options like unlocking accounts, suspending users or forcing a password change. See Manage Users in the MTP to learn more.
Devices Tab
Admins can see all of the devices they manage across all tenant orgs in the MTP, and quickly take action to resolve any issues. You can filter by Organization, Status, or Device OS to quickly see which devices need help and select from options like locking, restarting or shutting down devices. You can also start Remote Assist from here. See Manage Devices in the MTP to learn more.
Administrators Tab
To use the Administrators Tab:
- Once logged into the MTP, click on Administrators.
- Add administrators to your MSP organization’s MTP by clicking clicking the plus icon ( + ) in the left corner or search for an existing one. If you are creating a new one, see Manage MSP Admins in the MTP to learn more.
- Information is organized into columns displaying Name, Email and Role you have in each organization.
- See Manage Admin Roles in the MTP to learn more about roles and permissions.
Activity Tab
To use the Activity Tab:
- Once logged into the MTP, click on Activity.
- You can filter by the dropdown menus at the top; Time Range, Event Type, or Initiated By, then click Apply.
- Click Download to save the report locally.
Account Tab
To use the Account tab:
- Once logged into the MTP, click on Account.
- Review the Account Overview
- Click the ‘eye’ icon to view your Provider ID, or the ‘copy’ icon to copy it directly to your clipboard. API Keys are only displayed at the time they’re created. If you haven’t generated an API key yet, you will have the option to Generate New API Key. Make sure to store it in a secure place, like JumpCloud’s Password Manager so you can access it when you need it. You can Generate New API Key at any time.
![]()
Once a new API key is generated, it will revoke access to the current API Key. This will render all calls using the previous API Key inaccessible and you will need to update any integrations with the new API key. See JumpCloud APIs for a list of affected integrations.
- Review your Payment History.
- Review information related to payments, such as Invoice Number, Due Date, Status, Amount Billed, Amount Paid, and Amount Owed.
- Under Billing Information, enter the mailing and billing information for the payment associated with the account and click Submit Payment Information.
- Note: Rest assured that your payment is secured with SSL encryption.
- Manage the Usage associated with the account and view metrics such as Last Month HWM (High Water-mark), Current Users, Devices, Current HW, and User Cap.
Integrations Tab
To use the Integrations tab:
- Once logged into the MTP, click on Integrations.
- Configure integrations from a list a supported options, request new integrations, and sign up for beta versions.
- See Integrate Autotask PSA in the MTP or Integrate ConnectWise Manage in the MTP to learn more about our integrations.
Admin Console MTP Menu

To use the admin console MTP menu:
- Click the MTP dropdown menu to see a list of all of your managed organizations. Click on any of them to launch their admin portal.
- This allows you to toggle back and forth easily between your managed organizations.
Admin Console MTP More Actions Menu

To use the admin console MTP more actions menu:
- Click your initials in the top right hand corner.
- The dropdown menu will pull up multiple options for you to select from:
- Administrator email
- Change Password
- Launch User Portal
- Administrators
- My API Key
- Log Out
Interested in our Integrations? Learn more:
- Integrate ConnectWise Manage in the MTP
- Integrate Autotask PSA in the MTP
- Integrate Syncro PSA in the MTP